Showing posts with label Workflow. Show all posts

Sunday, January 23, 2011

MOSS: Multiple Line Text Field - Consolidate appended text from versions for use in SharePoint Workflow

When playing around with "Multiple Lines of text" fields that were configured to append changes to the previous versions. I found that when trying to use the value in the field in a workflow created using SharePoint Designer, it would only find the value entered into the field in the most recent version of the item even if the field was left blank. For example, if you create a new list item with some text in the multiple lines of text field, the workflow will pick up the value as expected. If you then make a change to the item, but leave the appended text field blank this time, the version is incremented and the most recent version will not have a value for this field. The result in the workflow created using SharePoint Designer was that it would only see the value in the field of the most recent version. I needed all entries appended to the field, and not just the most recent by consolidating the text from each version.

I achieved this using a workaround solution, as I was not able to access data from past versions of a list item without writing or installing custom workflow extensions for SharePoint Designer. My solution was to create a hidden text field in the list, which was updated using a separate workflow each time a change is made to the list item to replicate the "Append Text" functionality.

I left the original multiple line text field configured to append text to previous versions so that the historic entries of the text field could still be displayed in the standard display or edit form (the hidden field is not visible on edit/display fields as it should be manually edited by a user). The process of the workflow to append the new text to the hidden field was quite simple. I first used the "build a dynamic string" action to create a workflow variable that contained the past entries as well as the newly updated entry, including the modify date and modified by user for reference purposes. The next and final step is to update the hidden field with the value in the workflow variable only of the value in the two are not already equal. If they are equal when the worklow is initiated, the workflow will do nothing (stop). This is to help prevent the workflow from entering an indefinate loop for environments with SP1 or no service packs installed. This is because the process of updating the hidden field in the current list item can trigger a new instance of the workflow creating an endless loop. Incorporating a simple test into the logic to only update the hidden field if the new value is not equal to the existing value will prevent this from happening.

Now, when I need to use the the contents of the appended text field in a workflow, I can use the contents of the hidden field, which will contain the equivalent to the historic appended text field entries and not just the value from the most recent version.

Related:


Monday, August 16, 2010

InfoPath SharePoint Development

SharePoint News & Development Resources
DevSharePoint.com provides the latest SharePoint news and resources. Stay up to date with SharePoint 2010, MOSS 2007, WSS, SharePoint Designer (2007/2010), InfoPath.

InfoPath & SharePoint Development Tutorials, Resources & How To's
InfoPathSharePoint.net provides the latest InfoPath development tutorials, InfoPath Form Services administration tips, tricks and how to's. InfoPath SharePoint Integration: Integrate InfoPath Forms with SharePoint lists, libraries & workflow.

SharePoint & InfoPath News & Resources
SharePoint Administration, Development, Design & Customization Resources from around the internet. SharePoint & InfoPath News. InfoPath SharePoint Integration. InfoPath Form Template Design. InfoPath Form layouts, design tips & techniques.

Thursday, February 4, 2010

SharePoint Workflow Errors: Descriptions, resolutions and Workarounds

The following table lists some of the common errors that can occur in a Workflow developed using SharePoint Designer. A short description of some of the likely causes for each error are also provided.

More detailed examples of the following scenarios where an error may occur in a SharePoint Designer workflow are also provided later in this post:
  • Exiting / Breaking a Looping Workflow using Workflow Errors
  • Workflow Permissions
  • Changing the name of a Document in a Document Library
If you come across a workflow error which is not explained below, please post details in a comment to this post. I will ammend the table and information below to include any additional errors, descriptions and possible causes to build a comprehensive list of workflow errors and resolutions when developing using SharePoint Designer.

Workflow Error Summary Table

Status / Event TypeDescriptionOutcomePossible Cause(s)
ErrorError updating a list itemList Item Not FoundNo item in the list matching the critera used to find a list item being updated.
ErrorError updating a list itemAccess DeniedPermissions of the user who initiated the workflow don't allow them to modify data in the list item.

- Stopped

Event Type: Error

Error Deleting a list itemAccess DeniedPermissions of the user who initiated the workflow don't allow the user to delete items from the list.
ErrorError updating a list itemUnknown Error

Attempting to update Approval Status of a list item from a Workflow initiated by a user without approve permissions on the list/library.

- Failed on Start (retrying)

- Stopped

(Event Type: Error)

Error updating a list itemUnknown Error

Incorrect data types.

Eg. attempting to include illegal characters in the filename of a document by appending the date to the filename.

Permissions:

Attempting to update a list item using the permissions of the user who initiated the workflow, who doesn't have access to update items in the list.

ErrorAn error has occured in ...Workflow Name
A previous workflow error has caused the workflow to halt.
ErrorError updating a list itemDocument must be checked out

The document or list item being updated is in a list or library with force checkout enabled.

First check out the document before making changes from a workflow, or disable force checkout.

Note: Setting the Approval Status via a Workflow created using SharePoint Designer is not possible when Force Checkout is enabled.


Below are a series of scenarios where Workflows developed using SharePoint Designer will halt or stop due to a Workflow Error. An explanation of the cause of the error, as well as a resolution or workaround for the issue are also provided for each scenario. There are also instances where a workflow error can be caused intentionally to break a looping or repeating set of workflows once the looping sequence has completed (eg. processing all list items - see below).

Error Scenarios

Exiting / Breaking a Looping Workflow using Workflow Errors:
Looping Workflows developed using SharePoint Designer are often configured to stop due to a list item not being found. For example, when processing all items in a list using looping workflows, each instance may be initiated by updating a field from each item in the list being processed to initiate a separate iteration of the loop for each item. When all items have been processed, the workflow will not be able to find the next list item adn as a result will halt with an error ("Error updating a list item" : "List Item Not Found"). In cases similar to this, the workflow may not have stopped, as the workflow will sometimes retry the operation which caused an error depending on the type and severity of the error. Also, some errors will prevent new instances of the workflow initiating on the same list item with a workflow error. In scenarios where the workflow process should loop, this can be a problem as the workflow may not be able to move past the first iteration, or will cause the loop to stop if a workflow halts midway through the looping process.

Resolution / Workaround:
To ensure that a workflow loop continues until it has completed all required iterations, configuring the workflow initiate when an item is added to the list will result in each workflow initiated for each iteration of the loop being associated with a different list item. If one of the workflows halts due to an error (intentionally or unintentioanlly), the remaining iterations and components of the workflow can still continue as they will always be initiated on new list items added to the list. To help keep lists tidy, it may be a good idea to include an action late in the workflow to remove the current (temporary) list item once it has completed operations required for the current iteration and initiated the next iteration of the loop. After all items in the separate list have been processed. The workflow for the final list item created will stop due to a "List Item Not Found" error. As there will be not remaining items in the list which match the criteria required to find and initiate the next iteration, the loop will stop, breaking out of the looping sequence.


Workflow Permissions:
It is very common for developers of workflows in SharePoint to have elevated permissions on the SharePoint Site Collection in comparison to the general end-users of the SharePoint environment. This can lead to workflows not functioning as expected, or not working at all once in use, as testing may have been completed using the permissions of the workflow developer. To help prevent access / permission issues with workflows in SharePoint, you should always thoroughly test workflows using accounts with identical permissions to end-users of the SharePoint environment and workflow. In some cases this may require you to test using multiple accounts with varying permissions matching that of the end-users, or to change the permission level of one or two test accounts in order to test all possible scenarios.
As a workflow runs using the permissions of the user who initiated / triggered the workflow, in many cases during development it will be running using the credentials / permissions of the developer. If the developer has elevated access to components on the SharePoint site including lists associated with the workflow, the workflow will often function as expected during development, but not work once deployed into a production environment.

Resolution / Workaround:
When a workflow is initiated by a user with standard permissions, and the workflow needs to complete actions that would require the user to have a greater permission level on the site and lists, you can split the worklfow into components which are then initiated by users with the required permissions.

For example, a general user may make a change to a document stored in a document library with content approval enabled. A custom approval workflow is initiated to create and assign tasks to have the changes approved. As the Approval Task is created by the workflow running as the user who submitted the changes for approval, the user requires permissions that allow them to add items to the Approval Task list.

If using the "Collect data from user" action to get the approval status of the changes from an Approver, the workflow will continue to run as the user who initiated the worklfow (not the approver) once the approval status has been collected. This will result in a Workflow error if you try to update the approval status of the list item or document, as the user who made and submitted the changes for approval doesn't have approve permissions on the list/library. A solution for this problem is to split the workflow into two separate workflows. One to initiate the approval process and create the approval task item, and a second workflow on the Workflow task list which will be initiated by the approver when the approval status for the changes is set. You will not be able to use the "collect data from user" action, as this will result in the workflow continuing using the credentials of the user who initiated the workflow and a workflow error when attempting to set the Approval Status. Instead, you should create a new content type with only the fields required to collect the Approval Status for a modified list item and use the "Create List Item" action to create the Approval Task. Once created, associate the content type with a task or other list type, making it the default and only content type available on the "New" menu for the list. In the workflow associated with the content approval enabled list, you should use the "Create List Item" action to add an Approval Task item to the task list, then complete the workflow (Stop).

The Second workflow associated with the task list should be configured to initiate when an item in the Approval Task list is modified. The first step in the workflow should be to check to see if the Content approval status has been set by the approver. If not, then the workflow can stop as it will be reinitiated when the approval status is updated by an approver. If the approval Status has been set, then the workflow can continue to update the Approval Status of the list item or document that was changed and submitted for approval. The approval status can now be set by the workflow as it will be running using the permissions of the approver, not the user who initiated the approval process.


Column Data Types & Limitations
Attempting to set the value of a column in SharePoint that requires a specific data type such as a List Item ID, date or filename (Name) will result in a Workflow error when the incorrect data is assigned to a field/column in the list item or document. When developing workflows using SharePoint Designer, restrictions have been implemented to help ensure that the correct data type is used when setting workflow variables or fields in a list item. For example, when setting the value of a date/Time field, only a date variable or field can be set as the new date value. Similarly, when working with list items in SharePoint from a workflow, SharePoint Designer uses the List Item ID data type when retrieving or storing the ID of the current or another list item to ensure that only one (unique) item is returned.


Changing the name of Documents in a Document Library from a Workflow
- Difference between the "Name" and "Name (for use in forms)" fields
- Illegal / Special Characters in Document Filenames causing workflow errors.
- How to use calculated columns to remove illegal / special characters from a date or other field to be set or included in the document filename.

The "Name" and "Name (for use in forms)" columns in a SharePoint document library both refer to the same data, being the filename of the document of file, but function differently when updated by a Workflow Developed using SharePoint Designer. The main difference when using the Name columns in a Workflow is that the file extension for the document is included when using the "name (for use in forms)" column, but not the "Name" column.
  • Name - Doesn't include file extension
  • Name (for use in forms) - Includes file extension
When setting the value for the "Name" or "Name (for use in forms)" fields, special / illegal characters need to be considered, as the workflow will stop with an "Error updating a list item" error, with the outcome "Unknown Error". This is due to the fact the SharePoint doesn't allow specific characters to be included in the Name (filename) of a document stored in a Document Library. See Illegal Characters in SharePoint Document Libraries for more information about non-supported special characters for filenames in SharePoint.

Use calculated columns to format the created date to be appended to the filename (Name) of a document or form:

1. Configure a calculated column on the Sharepoint document library that formats the created date as a string with no illegal / special characters, that can then be included in the filename of the document.
Calculated Column: Generate a text string containing the created date in a specific format (dd-mm-yyyy : 03-02-2010)

=TEXT([Created],"dd-mm-yyyy")

2. Configure a workflow to append the value from the calculated column to the "Name (for use in forms)" fields of the document.
To append the date to an existing filename, you will need to use the value from the "Name" column, as it will not include the file extension. You would do this using the "Build dynamic string" workflow action, which would first take the original filename (without the file extension), then append the value from the calculated column containing the formatted date. The file extension can be included in the new filename string, but is not required. Once the new filename have been generated, you can set the "Name (for use in forms)" field for the current item using the "Update list Item" action, or the "Set field in current item" action.

Related:
Troubleshoot workflow errors

Access Denied when trying to upload multiple files to a SharePoint Library when one of the files contains an illegal character.

Monday, January 25, 2010

How to configure a workflow to start at specific time, then loop / repeat periodically (Daily, Weekly)

The following method can be used to start a workflow at a specific time, then repeat periodically (each day).

Periodic Workflow Processing (send daily email notification or reminder)
A useful implementation of this technique allows you to configure workflows to run as background tasks at a specific time instead of being triggered by a user manually, or after creating or modifying a list item. This allows processing of data from SharePoint to take place during times when the SharePoint environment is not being used as well as performing tasks that take a long time to complete.
For example, this method can be used to configure a looping timer workflow to run at COB each day (5:00pm) to perform calculations and processing on a list item before emailing a reminder, or details to a user associated with the list item or document. When initiated for the first time, the workflow waits until the specified time (5:00PM) before executing workflow actions. After the workflow is complete, a secondary list item is modified, which in tern initiates a new instance of the workflow. As the initial time (and date) that workflow waited until to start would have passed by the time the workflow is started the second time, the workflow waits for a specified period of time instead (eg. 1 day) before completing the workflow actions. The result is a looping timer workflow that starts at the time specified, then repeats on a periodic basis (every 24 hours / daily) indefinitely, or until certain criteria is met.
As the repeating sequence only needs to be initiated once, this method can be used to build workflows to complete background processing to help minimise the impact on users, as well as improve usability and functionality of web applications created using components of SharePoint. See below for an example of a Looping Timer workflow used to complete processing as a background task at a specific time each day.

Looping Timer Workflow for Background Processing
When a workflow takes time to process but doesn't require user input or intervention, it is possible to configure the workflow to run as a background process to eliminate the need for users to initiate the workflow each time it is required, as well as allowing complex and timely processing to be completed "behind the scenes". As these workflows may take a long time to complete forcing a user to wait for the workflow to complete after manually initiating, or modifying / adding an list item to a list to initiate the workflow can result in frustration if there are long delays. Configuring workflows such as this to repeat periodically allows the workflow to start and finish in it's own time, eliminating the need for SharePoint users to initiate and control the workflow. Other workflows initiated by users can then refer to the data generated and stored by the looping workflow allowing them to complete in a short amount of time as no complex or in-depth processing is required to complete the operation.
The looping workflow sequence is initiated once, then repeats indefinitely or until a specified date if required. The workflow will complete the operations required for each iteration, then pause until the operation is to be executed next. This will mean that the workflow will continue to complete the processing without a user needing to manually initiate a new instance of the workflow. A common implementation of this technique may be to send a daily or weekly email report or reminder with details of a list item or data from many lists and items similar to the example above. Other scenarios where this can be utilised are times when workflows are used to process many list items, as well as perform calculations and other operations on the list items that require time to process. With scenarios such as this, configuring a looping timer workflow to automatically initiate and complete the processing at a specific time each day (or hour) eliminates the need for a user to have to initiate the workflow, as well as allowing the workflow to complete seamlessly to users in the background.


Example: Daily Sales Report Workflow using SharePoint
Calculate sales totals for the current day's invoices. Store the data in a separate "Reports" list item for the day.
A looping workflow may be configured to loop through each item in a SharePoint list (Invoices), then extract data from a specific field from each list item which is the added (concatenated) to a field in a secondary list item (Invoice Reports) for other workflows to refer to, or later use by SharePoint users. The workflow would process all Invoices which have not yet been processed, which will be any from the current day, as invoices from previous days will already have been processed.
A looping timer workflow can be configured to run at a specific time, then repeat every 24 hours to initiate the workflow(s) that loop through all items in a SharePoint list. The looping timer workflow will initiate the looping workflow to process invoices each day. A looping workflow can sometimes take a while to complete if there are a large number of items in the list. Configuring the workflow to be initiated by a user may not be appropriate as the delay may reduce the effectiveness of the workflow and increase user frustration. Configuring a timer workflow to initiate the workflow loop allows the processing (of all items in a list) to complete in isolation to workflows initiated by users that refer to the data generated when processing all list items.
Depending on how often the data changes and how important it is that the data is up to date, you may need to configure the looping timer workflow to initiate the workflow to process all items at shorter intervals (eg. hourly, every 10 minutes, etc.). As long as the list containing the items being processed is separate to the list item that stores the data from all items, it would also be possible to initiate the workflow loop to process all items when any of the items in the list are updated or added. If configured this way, an "On Change" and "On Create" workflow would initiate after a list item is added or modified, which would then make a change to the secondary list item to initiate the workflow loop sequence. The loop sequence would then process each item in the list until complete.
See below for a breakdown of a Background Processing Workflow that repeats daily using the above example.


Looping Processor / Looping Timer Workflow
Components (Daily Sales Report):
SharePoint List: Invoices
- Invoice 1
- Invoice 2
- Invoice 3
The "Invoices" list is the list which contains the items to be processed. Each item / "Invoice" ion the list is processed to calculate daily sales totals for each staff member.

Invoice Reports
- Report xxx (20-01-10)
- Report xxx (21-01-10)
- Report xxx (22-01-10)
This "Invoice Reports" list contains one list item for each day. The report data from each invoice item for the current day will be added to an Invoice Report item in this list once all have been processed to calculate sales totals.

Workflow Control List
- Temporary items used to initiate and control workflows and the looping functionality.

Workflows:
- Invoice Processing Workflow
- Initiate Invoice Processing Workflow
- Invoice Processing Timer Workflow


Looping Timer and Background Processing Workflow Diagram:
(Click to enlarge)


Workflow Details:

1. Invoice Processing Timer Workflow
This workflow will commence at a specified time (eg. 6:00 PM), then repeat every 24 hours (daily) after the first instance has completed. This looping timer workflow will be used to initiate the "Initiate Invoice Processing" (Looping Timer Workflow) at the end of each day by creating an item in the Workflow Control list with the title "Start Report Loop". This "Invoice Processor Timer Workflow" workflow will only need to be initiated once, as it is configured to automatically trigger a new instance of the workflow each day. When configured using SharePoint Designer, one of the first steps in the workflow would be to test if the current time is before or after the start date/time for the workflow (specified in a "start_date" field in the list item).

2. Initiate Invoice Processing Workflow: (Looping Timer Workflow)
The purpose of this workflow is to initiate an instance of the "Invoice Processor Workflow" on each item in the list being processed. The workflow will initiate when an item is added to the Workflow Control list with a specific title (eg. "Process Next Invoice"). The workflow will find the first unprocessed item available list item from the Invoices list, and update a field which indicates that it is being processed ("Processed" = no/false). Updating the field will initiate the On Change workflow (Invoice Processor Workflow) to process the updated item.

3. Invoice Processing Workflow
Process an item from the Invoice List. A separate instance of this workflow will be initiated for each item in the list each time the looping workflow sequence is executed. Updates the item from the invoice Reports list with data from each Invoice (daily totals: sales, turnover, profit, sale type, compute staff rank based on total profit, etc.).


Workflow Control List & Workflow Triggers
The workflows associated with the Workflow Control List Invoice Processing Timer (1), Initiate Invoice Processing (2) ) are should be configured to start when a new item is added to the list. The first step of the Invoice Processing Timer (1) workflow will be to stop the workflow if the Title of the current item (item added to the list) is not equal to "Start Report Loop". This will mean that other items added to the workflow control list with a Title that isn't "Start Report Loop", won't initiate the Invoice Processing Timer (1) workflow unnecessarily. The Initiate Invoice Processing (2) workflow should have a similar configuration for the first step: Stop if the Title of the current item is not "Process Next Invoice". This will mean that only items with this title will continue into the remain workflow steps.

The Invoice list will need a column/filed to flag if the Invoice has been processed or not. This could be a hidden boolean (true/false) field "Processed" or similar, which would be set to No/false as default when an Invoice is added to the list. The "Processed" field would be used by the Initiate Invoice Processing (2) workflow to find the next Invoice item to be processed. The unprocessed Invoice item found should then be updated by setting "Processed" to yes/true, which will then initiate the Invoice Processor (3) workflow for that Invoice. The final step of the Invoice Processing (2) workflow after initiating the next Invoice Processor workflow in the sequence can be to remove the current item ("Process Next invoice"), as t is no longer required. The final steps of the Invoice Processor (3) workflow should be to create a new item in the Workflow Control list with the title "Process Next Invoice", which will re-initiate the Initiate Invoice Processing (2) workflow creating the looping functionality, then set "Processed" to yes/true.

As the workflow is scheduled to run every 24 hours, items in the Invoices list from previous days will already have been processed by previous instances of the workflows. Only invoices added to the Invoice list since the last time the Report workflows were run, which will be any from the current day.


Related:

SharePoint Looping Workflow - How to: Loop through and process all items in a list
To use SharePoint workflows to loop through all items in a list to perform calculations, process and update metadata values, or concatenate the value of a specific column in all list items into a single string.

How to get an SPD Workflow to Run at a Specific Time – Employee Vacation Reminder: Part 5

(Looping) Timer Workflows Using SharePoint
Looping timer workflow (eg. send a daily notification/reminder until a specific condition is met.


How to wait for a change in any list, wait for multiple field changes in the current item (SharePoint Workflow)
This article describes techniques which can be used when developing workflows in SharePoint using SharePoint Designer. They allow a workflow to wait for a field change in an item in another list, or to wait for multiple field changes in the current item before continuing.

SPD Workflow - Test if value exists in any item in SharePoint list - create new item if not found
SharePoint Designer Workflow: How to test if a specific value exists in any item in a list without the workflow stopping due to a "List item not found" error if no items exist with the required value.


SharePoint Workflow Errors: Descriptions, resolutions and WorkaroundsThe following table lists some of the common errors that can occur in a Workflow developed using SharePoint Designer. A short description of some of the likely causes for each error are also provided.

Sunday, January 24, 2010

SharePoint Designer: Get account details of the user who initiated the workflow using OOB Workflow Activities

Get account name of the user who initiated / triggered a workflow using OOB SharePoint Designer Activities:
The ability to access the account details of the user who started a workflow in Sharepoint is not supported when developing workflow using SharePoint designer and OOB workflow activities. The User data type allows selection of the User who created the item, but not the user who initiated the workflow. Using the Modified By field will return the user who made the most recent changes to the document/list item or meta data, but may not be the user who initiated the workflow. For example, if a workflow is used to set the approval status of a list item or document with content approval enabled is initiated, the user who published a major version of the documnent (submit for approval) will be the user who initiated the workflow regardless of who made the most recent changes to the document.

A number of solutions relating to this issue / limitation are available, including a workaround solution using OOB workflow activities and SharePoint designer explained below:

How to get the account name of the user who initiated a workflow using OOB workflow Activities and SharePoint designer:

1. Create/modify item in secondary list.
This action will be executed using the credentials of the user who initiated the current workflow. Once the list item from the secondary list has been created or updated, you can then retrieve the Creaded By or Modified By user.

2. Pause, then store the user who created/modified the secondary list item in a Workflow variable (string: "DOMAIN\user").
After the secondary list item has been created or modified, you can store the value of either the Created By or Modified By fields of the secondary item to get the account name of the user who initiated the current workflow. Note that you may need to configure the workflow to pause for 1 minute after creating or modifying the secondary list item, as it takes a few seconds for the account details to become available after creating or modifying the item.

3. Use the value of the workflow variable.
Once you have stored the user who started the workflow in the workflow variable, you can then use the value when setting the Assigned To, email recipient or any other field that uses the user account data type.


Related:

In sharepoint designer’s workflow editor how do I get the workflow initiators username?
"In Sharepoint designer's workflow editor I wish to retrieve the username/name of the work flow initiator (i.e. who kicked it off or triggered the workflow) - this is relatively easy to do using 3rd party products such as Nintex Workflow 2007 (where I would use something like {Common:Initiator}) - but I can't seem to find any way out of the box to do this using share point designer and MOSS 2007."

Wednesday, January 13, 2010

SharePoint Looping Workflow - How to: Loop through and process all items in a list

Objective
To use SharePoint workflows to loop through all items in a list to perform calculations, process and update metadata values, or concatenate the value of a specific column in all list items into a single string.

Background
The OOB workflow actions provided by SharePoint don't allow a loop to be configured explicitly. Instead, a number of workflows can work together to create a looping affect. Another limitation of Workflows in SharePoint using SharePoint Designer (SPD) is the inability to simply test if the user who initiated the workflow is a member of a SharePoint group, or to test if the value of a field in the item which initiated the workflow is equal to the value of a specific field from any item in a separate list.

For example, the OOB Approval Workflow requires that a user who is an Approver of changes to approve their own changes each time a modification is made. In many cases, Approvers are also the users who make many of the changes that require content approval which can result in the user wasting time and becoming frustrated when many documents/items need to be updated. To simplify the workflow, you could loop through each item in a separate list that lists each of the users who are approvers to check if the user who initiated the workflow is an Approver. If the user is an approver, the Content Approval Status of the item can be set to "Approved" making the changes visible to other users. The list of approvers would been to be stored in a list instead of a SharePoint group, as SharePoint Designer doesn't allow you to test if a user is a member of a group. Storing the list of approvers in a SharePoint list allows you, or someone else to easily add/remove users from the list. Note that the users added to the approvers list would still require the appropriate permissions applied to approve changes. To loop through the items in the Aprovers list, a looping workflow would need to be configured to process each item in the list.


How To Create a Looping Workflow in SharePoint

A number of lists will, along with multiple workflows configured to trigger each other will be used to create the looping workflow. As there is no option when developing OOB workflows using SPD to loop through items in a list, a separate workflow will be configured to perform the required actions on a single item. This workflow would start when an item is modified, completing the required actions/processing for the item. When complete, the "Item Processor" workflow will re-initiate the parent workflow which will then initiate a workflow to process the next item in the list. A custom Boolean (True / False) field "Processed", or similar will be added to the list that contains the items that need to be processed. This field will be used to find and trigger the workflows to process each item in the list once.

When all items in the list have been processed, the workflow not be able to find the next item in the list based on the specified criteria and as a result will cause the "List item not found" error and the workflow will stop.

As new instances of a workflow won't always start if there is another running instance that has an error, the parent workflow will be initiated each time by creating a new item in the Workflow Control list. The parent workflow can remove the workflow control item once it is complete to help keep the SharePoint lists tidy.


Considerations & Limitations
If Service Pack 2 or higher has been installed on the servers hosting SharePoint, workflows will function different to an environment at the SP1 level or less as after SP2, an "On Change" workflow won't re-initiate itself when the current item is modified. This can affect looping workflows, as they may have been configured to loop by updating the current item. The looping workflow solution detailed below should work on servers with or without SP2 installed.

Looping Workflow Components

Lists/Libraries:


Items - The list containing the items you wish to process using a loop.
The Items list will need to have a Boolean column/field added with a title "Processed" or similar, which will be used to create the looping functionality as well as to determine if an item in the Items list has been processed or not.

Workflow Control - The list to initiate and control the workflow loop. Use a custom list for the Workflow Control list, as the title of Workflow Control items will be used to help control the Parent workflow.

Workflows:

Item Processor:
- Associated with the list of items you wish to process.
- Starts when an existing item is modified.

Workflow Control:
- Associated with the Workflow Control list.
- Starts when a new item is created.


Looping Workflow Sequence:
Each step in the following sequence should be interpreted as a step in a Workflow created using SharePoint Designer. Step 2.2 (Items Processor) can be configured in as many workflow steps as required to complete the processing for an item. It is important that the remaining steps are configured and executed in the sequence below.
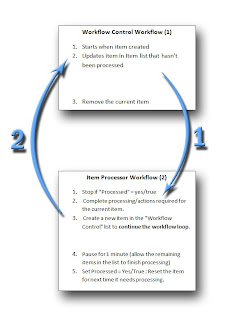
Workflow Control (Parent) Workflow (1):
1. Item created in "Workflow Control" list initiates parent workflow.
1.1 - Update the "Processed" field from an item in the "Items" list to No/false: find the item by searching for an item in the list where "Processed" = Yes/true
1.2 - Remove the current item as it is no longer required.

Items Processor Workflow (2):
2. Workflow starts when an Item is modified by Parent Workflow (Processed = No/false)
2.1 - Stop if "Processed" = yes/true (Prevent instances of the workflow running when they are not supposed to, if a user makes a change in the item which triggered the Item Processor workflow).
2.2 - Complete processing/actions required for the current item.
2.3 - Create a new item in the "Workflow Control" list to continue the workflow loop.
2.4 - Pause for 1 minute (allow the remaining items in the list to finish processing)
2.5 - Set Processed = Yes/True : Reset the item for next time it needs processing.

Looping workflow diagram (Click to enlarge):
Looping workflow diagram


Looping Workflow Details:
1.1 The parent workflow starts when an item is added to the Workflow Control list. All the Workflow Control workflow needs to do then is update the value of the "Processed" field in of an item in the "Items" list, by finding the first item where "Processed" equals Yes/true. This will initiate the Items Processor workflow for first item found that matches the criteria. The current item in the Parent (Workflow Control) list can the be removed as it is no longer required.
1.2 - Once an Items Processor workflow has been initiated, the current item in the Workflow Control list is no longer required and can be removed. Once all items in the "Items" list have been processed, Step 1.1 of the Workflow Control workflow will have completed, as it will halt with the "List item not found" error, which will result in one (the last) item in the Workflow Control list to remain.

2.1 When the Items Processor workflow is initiated after a Parent workflow sets the "Processed" field to Yes/true, the first step is to test if the Processed field equals yes/true, and stop the workflow if it does not. This prevents the workflow from initiating out of the looping workflow context. If using SharePoint with SP1 or lower, the final step of the "Items Processor" workflow (Setting the "Processed" field back to Yes/true) can cause an endless loop. Stopping the workflow in the first step if Processed doesn't equal Yes/true will prevent an endless loop.

2.2 The next step(s) of the items Processor workflow complete the actions or processing required for the current item. This may include adding up the value of a numeric field to find the total for all items in the list, or concatenating the value of a field in from all items in the list into a single string which can then be used to perform more complex tests/tasks based on data from multiple items. If calculating or generating a single value or string from data from all items in the list, you will need to store the results of the calculations in a separate list item that each workflow would refer to and update after completing the processing for an item. For details of an implementation of this example, see the article How to wait for a change in any list, wait for multiple field changes in the current item (SharePoint Workflow) (Test if an item exists in a list with certain criteria, continue workflow if not and create a new item in the list with the specified criteria).

2.3 Creating a new item in the parent "Workflow Control" list re-initiates a new instance of the parent workflow, which will find and initiate the Items Processor workflow on the next item in the Items list that has not yet been processed.

2.4 Pausing for 1 minute allows the remaining items to be processed by the looping workflow sequence. After pausing for a minute, the "Processed" field in the current item is set to Yes/true to indicate that the item has been processed. This will also prevent further instances of the workflow initiating unless by another (new) instance of the entire looping workflow sequence.


Related Articles:
How to wait for a change in any list, wait for multiple field changes in the current item (SharePoint Workflow)
Test if an item exists in a list with certain criteria, continue workflow if not and create a new item in the list with the specified criteria

(Looping) Timer Workflows Using SharePoint
How to create a looping timer workflow (send a daily notification/reminder until a specific condition is met)


How to configure a workflow to start at specific time, then loop / repeat periodically (Daily, Weekly)The following method can be used to start a workflow at a specific time, then repeat periodically (each day). Periodic Workflow Processing: (send daily email notification or reminder)A useful implementation of this technique allows you to configure workflows to run as background tasks at a specific time instead of being triggered by a user manually, or after creating or modifying a list item.

SharePoint Workflow Errors: Descriptions, resolutions and WorkaroundsThe following table lists some of the common errors that can occur in a Workflow developed using SharePoint Designer. A short description of some of the likely causes for each error are also provided.

SPD Workflow - Test if value exists in any item in SharePoint list - create new item if not found
SharePoint Designer Workflow: How to test if a specific value exists in any item in a list without the workflow stopping due to a "List item not found" error if no items exist with the required value.

Saturday, November 28, 2009

How to wait for a change in any list, wait for multiple field changes in the current item (SharePoint Workflow)

This article describes techniques which can be used when developing workflows in SharePoint using SharePoint Designer. They allow a workflow to wait for a field change in an item in another list, or to wait for multiple field changes in the current item before continuing.

This can be achieved by configuring an On Change workflow to stop if the required criteria is not met, instead of using "Wait for field Change in the current item" actions in a Parallel fashion which limits functionality. The first step in the workflow can contain as many conditions as required, using the standard tests against fields in the current item, or a field in an item in another list on the sameSharePoint site. If the conditions are not yet met, the workflow will stop. A new instance of the workflow will initiate every time data in an item is added/updated, and will continue only when all of the required criteria is satisfied. The action for all conditions in the first step will be to stop theworkflow and log a message.

Requirements


Create the workflow using SHarePoint Designer


  1. Load the SharePoint site using SharePoint Designer (File -> Open Site...)
  2. From the File Menu, select New to open the "New" dialog.
  3. From the SharePoint Content tab, select Workflow and then Blank Workflow
  4. Press ok to create the workflow.
  5. Set the name of the workflow
  6. Select the option to start the workflow when a new item is created, and when an existing item is modified. Un-check the option start the workflow manually if required. (On Change, On Create)

In the first step of the workflow, create a separate condition/action branch for each of the tests which need to be completed before the workflow can continue. For example, if you need the workflow to wait for a task in a separate list, but associated with the current item to be completed, you would create a condition which tests if the Task Status field of the task item is marked as "Completed". If not, the action will be to stop theworkflow . If you need to wait for multiple fields in the current item to change before continuing, a separate condition/action branch should be created for each, or at least a separate condition. Simple tests on yes/no fields can usually be added to the same branch without loosing functionality. Using a single branch with multiple conditions will also improve performance of theworkflow if there are a large number of conditions being checked each time the workflow starts.

When the conditions in the first step of the workflow are satisfied, the workflow can continue to the next step. In Step 2 of the workflow, a [workflow_started] field is set in the current item to indicate that an instance of the workflow is running. Any new instances will not run, as the [workflow_started] field in used as one of the conditions in Step 1 to determine if the workflow can start. Only one of instance of the workflow should progress to step to and beyond.


Example:

Workflow Step 1


Condition
  • If [Task Status] (separate list) does not contain "Complete"
Action
  • Stop workflow, log: "Task X not yet complete"


Condition
  • If [Project Code] (current list) "is blank"
  • OR: [Assigned To] (current list) "is blank"
  • OR: [workflow_started] (current list) equals "yes"
Action
  • Stop workflow, log: "Project details required"


Workflow Step 2


Step 2 and onwards will only run if all conditions were met in the first step. The first action which should be performed in Step 2 will be to set a [workflow_started] field in the current item to "yes" which indicates that an instance of the workflow is running. As only one instance of the workflow should run, the [workflow_started] field is used as a condition which will stop new instances from continuing past Step 1. The final step in the workflow will be to set the [workflow_started] field back to "no", or a separate [workflow_complete] field to "yes". If using a [workflow_complete] field, you may need to include a condition in step one of the workflow to prevent new instances of the workflow starting if one is running, or is already complete.

A looping workflow can also be created using this technique, as the final step of the workflow involves updating data in the current item (setting the [workflow_started] back to "no"), which will trigger a new instance of the workflow. If your SharePoint environment is running at the Service Pack 2 level or higher, an "On Change" workflow will not start a new instance of the same workflow when the current item is updated. To enable looping functionality when Service Pack 2 is installed, you will need to use an intermediate list which is used to trigger a newworkflow in the main list. See SharePoint Looping Workflow - How to: Loop through and process all items in a list for more information about how to configure looping workflows with Service Pack 2 installed and how to configure a Looping Workflow. For more information about looping workflows, and some scenarios where that can be used such as a looping timer workflow, see article (Looping) Timer Workflows Using SharePoint. The article describes how a looping workflow can be used to send periodic reminders or similar when certain criteria has not been met.


The example above has two condition/action branches, one which tests if a task in a separate list is complete, and the second tests if the "Project Code" and "Assigned To" fields of the current item have been filled. When the conditions are satisfied, theworkflow continues to Step 2 where a field is set in the current item to prevent new instances from starting. Step 3 until the final step will include the main functionality of theworkflow. The final step will involve resetting the field in the current item to indicate that the workflow is no longer running, or complete.

Note: You will need to create a relationship between the current list and the Task list, or develop some method of being able to select the correct task item from the task list. Alookup column in the task list pointing back to the current list can be a good way to link one or more task items to an item in a separate list. Alternatively, the ID of the Task item may be able to be stored in a field in the current item if known. When aworkflow needs to refer to the separate item, it can then find the item using it's unique identifier which will help prevent the workflow selecting the wrong item.

If you are storing the ID of a separate item in a workflow variable or a field in the current item, you will need to use the "List Item ID" workflow variable type, or a Lookup column to retain a relationship between list items. Workflows developed using SharePoint Designer should use the Lookup/List Item ID column/field data types to when selecting items using their unique identifier. In most cases, SharePoint Designer will not allow you to select an item from another list using the unique identifier used by SharePoint unless you use the Lookup/List Item ID data types.


Related Articles:

SharePoint Looping Workflow - How to: Loop through and process all items in a list
"The OOB workflow actions provided by SharePoint don't allow a loop to be configured explicitly. Instead, a number of workflows can work together to create a looping affect. Another limitation of Workflows in SharePoint using SharePoint Designer (SPD) is the inability to simply test if the user who initiated the workflow is a member of a SharePoint group, or to test if the value of a field in the item which initiated the workflow is equal to the value of a specific field from any item in a separate list."


SPD Workflow - Test if value exists in any item in SharePoint list - create new item if not found
SharePoint Designer Workflow: How to test if a specific value exists in any item in a list without the workflow stopping due to a "List item not found" error if no items exist with the required value.

How to configure a workflow to start at specific time, then loop / repeat periodically (Daily, Weekly)
The following method can be used to start a workflow at a specific time, then repeat periodically (each day). Periodic Workflow Processing: (send daily email notification or reminder)A useful implementation of this technique allows you to configure workflows to run as background tasks at a specific time instead of being triggered by a user manually, or after creating or modifying a list item.

Looping Timer Workflows
To have a looping timer workflow (eg. send a daily notification/reminder until a specific condition is met), the workflow must start when an item in the list is changed, and when it is created depending on the scenario.

SharePoint Workflow Errors: Descriptions, resolutions and Workarounds
The following table lists some of the common errors that can occur in a Workflow developed using SharePoint Designer. A short description of some of the likely causes for each error are also provided.

Service Pack 2 prevents an on-change workflow from starting itself

Sunday, October 18, 2009

(Looping) Timer Workflows Using SharePoint

Timer Workflows

It is often a requirement of a Workflow in SharePoint to monitor and respond to various dates such as a start or due date.

If the timer is not the main function of a Workflow, it can be created as a separate Workflow to that both can run in parallel with full functionality.

Looping Timer Workflows

To have a looping timer workflow (eg. send a daily notification/reminder until a specific condition is met), the workflow must start when an item in the list is changed, and when it is created depending on the scenario.

At the start of the workflow, test if the required condition has been met, and stop the workflow if it has. If the condition has not yet been satisfied, the workflow can continue.

As the workflow will initiate after an item is modified, it is possible for multiple instances of the same workflow to be initiated. To prevent this, a custom (boolean) field is added to the list which is used to determine if an instance of the workflow is already running. When the workflow starts, it first tests if the value of a custom field (eg. "timer_waiting") in the current item is set to true/yes. If true, another instance of the workflow is already running and the current can be stopped. If false, the custom"timer_waiting" field can be set to true/yes to stop new instances from starting until the current is complete.

If the workflow is to continue, perform the required date calculations (current date + 1 day), store in a workflow variable, then wait until the date determined. Send the email, or perform other actions after the workflow has finished waiting (next workflow step).

To complete the workflow, set the field in the current item "timer_waiting" back to false/no to allow a new instance of the timer workflow to start.

If the SharePoint (MOSS 2007) Server has no service packs installed or Service Pack 1 only, updating the field in the current item workflow will cause another instance of the workflow to start, creating the looping functionality. If service pack is installed, a separate list must be used to trigger the first again to enable looping workflows.

For more information about looping workflows in general, as well as the changes to looping workflows made when Service Pack 2 is installed, see Service Pack 2 prevents an on-change workflow from starting itself.


Related Articles

SharePoint Looping Workflow - How to: Loop through and process all items in a list

"The OOB workflow actions provided by SharePoint don't allow a loop to be configured explicitly. Instead, a number of workflows can work together to create a looping affect. Another limitation of Workflows in SharePoint using SharePoint Designer (SPD) is the inability to simply test if the user who initiated the workflow is a member of a SharePoint group, or to test if the value of a field in the item which initiated the workflow is equal to the value of a specific field from any item in a separate list."

How to wait for a change in any list, wait for multiple field changes in the current item (SharePoint Workflow)

This article describes techniques which can be used when developing workflows in SharePoint using SharePoint Designer. They allow a workflow to wait for a field change in an item in another list, or to wait for multiple field changes in the current item before continuing.

SPD Workflow - Test if value exists in any item in SharePoint list - create new item if not found
SharePoint Designer Workflow: How to test if a specific value exists in any item in a list without the workflow stopping due to a "List item not found" error if no items exist with the required value.

How to configure a workflow to start at specific time, then loop / repeat periodically (Daily, Weekly)
The following method can be used to start a workflow at a specific time, then repeat periodically (each day). Periodic Workflow Processing: (send daily email notification or reminder)
A useful implementation of this technique allows you to configure workflows to run as background tasks at a specific time instead of being triggered by a user manually, or after creating or modifying a list item.

SharePoint Workflow Errors: Descriptions, resolutions and Workarounds
The following table lists some of the common errors that can occur in a Workflow developed using SharePoint Designer. A short description of some of the likely causes for each error are also provided.

Wednesday, August 19, 2009

SPD Workflow - Test if value exists in any item in SharePoint list - create new item if not found

SharePoint Designer Workflow: How to test if a specific value exists in any item in a list without the workflow stopping due to a "List item not found" error if no items exist with the required value.

When trying to find a list item using the "Update List Item" action or similar in a SharePoint Designer workflow by matching a field which is not always unique (eg. the "Title" column/field), the workflow will stop if the list item is not found with a "List item not found" error. To prevent this, a looping workflow can be used to build a delimited string containing the value from the field being tested, for all items in the list.
Instead of trying to test if a specific value exists in any item in a list by testing the required field directly, the workflow can compare the string containing all possible values using a much larger range of useful conditions including "contains", "does not contain", "contains (ignoring case)", which can be used to test if the required value exists. If the value is not found, the workflow will continue as normal without causing an error as only a simple string compare had taken place.

This can be quite useful if you want the workflow to do one action if an item is a seperate list containing a specific value is found, and another action if not found (without stopping due to workflow error). This can be used to test if the is an item already exists in the list containing a specific value, and to use this item if found. If the item does not exist, then one is created (example/scenario below).

SharePoint Designer does not provide standard functionality to create a looping workflow, but it can be achieved using two separate lists with on-change workflows that trigger each other. A "flag" is set (Boolean) to determine if an item has been processed by this instance of the workflow, and used to find the next item to be processed. Once updated, the on-change workflow can either pause for a duration to allow the remaining items to be processed before resetting the flag, or a similar workflow can loop back through to reset each item.

The article Service Pack 2 prevents an on-change workflow from starting itself demonstrates how to create looping workflows using SharePoint Designer, but also provides important information about the difference in Workflow functionality between Service Pack 1 and Service Pack 2 for MOSS 2007. If you had looping worklfows functioning prior to upgrading to service pack 2, they may not work if the loop was being controlled from a single on-change workflow for this reason.

Example: Update an item if one exists with a specific title, or create/add a new item to the list if an item is not found with the required title field.


  1. Using a looping workflow, append the Title from each item in the required list in a separate list item to a string field separate to the items being processed.
  2. In the main workflow, build a dynamic string containing the required title value. Note: The "Build a dynamic string" action allows fields of different data types (Dates, People, Numbers) to be converted into a string and concatenated if required.
  3. Using the "Compare any data source" workflow condition, test if the required value is, contained in the string of all possible titles.
  4. If the title does not exist in the string, the workflow can then create a new item. If the title does exist in the string, then the workflow will be able to find the list item to be updated and won't stop due to the "List item not found error"

Related Posts:

SharePoint Looping Workflow - How to: Loop through and process all items in a list
"The OOB workflow actions provided by SharePoint don't allow a loop to be configured explicitly. Instead, a number of workflows can work together to create a looping affect. Another limitation of Workflows in SharePoint using SharePoint Designer (SPD) is the inability to simply test if the user who initiated the workflow is a member of a SharePoint group, or to test if the value of a field in the item which initiated the workflow is equal to the value of a specific field from any item in a separate list."


How to wait for a change in any list, wait for multiple field changes in the current item (SharePoint Workflow)

This article describes techniques which can be used when developing workflows in SharePoint using SharePoint Designer. They allow a workflow to wait for a field change in an item in another list, or to wait for multiple field changes in the current item before continuing.

Looping Timer Workflows
To have a looping timer workflow (eg. send a daily notification/reminder until a specific condition is met), the workflow must start when an item in the list is changed, and when it is created depending on the scenario.

How to configure a workflow to start at specific time, then loop / repeat periodically (Daily, Weekly)The following method can be used to start a workflow at a specific time, then repeat periodically (each day). Periodic Workflow Processing: (send daily email notification or reminder)A useful implementation of this technique allows you to configure workflows to run as background tasks at a specific time instead of being triggered by a user manually, or after creating or modifying a list item.


SharePoint Workflow Errors: Descriptions, resolutions and WorkaroundsThe following table lists some of the common errors that can occur in a Workflow developed using SharePoint Designer. A short description of some of the likely causes for each error are also provided.

Thursday, July 16, 2009

Integrate InfoPath Form with SharePoint Workflow

How to integrate InfoPath forms with workflow in SharePoint to give greater control over the functionality and user interface.

When an InfoPath form is set up to submit to a SharePoint library, fields in the form can be mapped to columns/fields in the SharePoint library, or a content type which is associated with a document library. See Submit InfoPath form to SharePoint List or Library using Content Type for details and an example of how to submit an InfoPath form to a SharePoint document library.

Workflow can then be set up on the document library to start when an item is created and/or modified. Having a time stamp in the filename for a newly submitted form will ensure the filename is unique.

When a submitted form is reopened and updated/modified, values in the form will be updated when the form is submitted (not saved), which will cause the workflow not to function if field changes aren't happening. To ensure that a submitted form overwrites it's previous version when opened and re-submitted, store the filename in a text field when the form is first successful submit event. When submitting the form to SharePoint, refer to the field when setting the filename for the form. To submit a form programmatically an XMLHTTP request, see artcle programmatically submit an InfoPath Form to a Windows SharePoint Services document library. This will give you full control over the file name for the form. If version control is enabled on the document library, this method of submitting the form allows the version number of the form to increment as required.

Once the form is overwriting it'self each time it is being submitted, it can be used as an iterface for a workflow. To use data from SharePoint lists and libraries in the form, see Using Secondary InfoPath Data Connections to retrieve data from a SharePoint List or Library.

Saturday, March 21, 2009

Get current time in Sharepoint Designer workflow

Get the current time in a standard SharePoint Designer workflow and assign to a workflow variable
I was having trouble getting the current time in a SharePoint Designer workflow when testing against a date/time field of the current item. I noticed that when testing if the date was greater than [today] which is the only option to test against the current date, the time was ignored as [today] returned 12:00 AM as the time.
To be a little more specific, I needed separate actions performed on the current item if the item's creation date/time + 4hrs was greater or less than the current time. In other words, the condition test was if it was created less than or greater than 4 hours ago.

Being unable to select a [now] option to test against the current time, I was getting unexpected results.

My solution (a little clunky, but works) to get the current time was to modify/update a temporary list item (update any filed with any value), wait a minute and then store the modification date in a workflow variable. I found that updating an item and getting the modification date was more efficient than creating a new item and getting the creation date.

I also found that if there is not a pause after creating/modifying the temporary list item an error often occured in the workflow when trying to get the modification date of the recently updated list item, as the modification had not yet registered correctly in the list. Setting a pause for the minimum (1 minute) ensures that when the date is retreived, the list item is ready.