Data View conditional formatting using SharePoint Designer
This article demonstrates how to use SharePoint Designer 2007 conditional formatting to format items in a SharePoint (MOSS 2007) list based on item metadata.

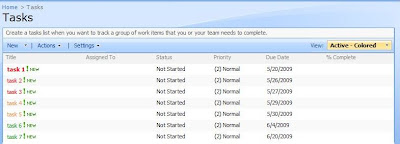
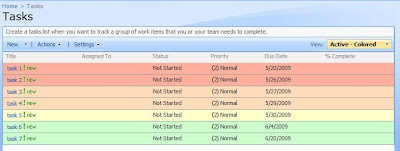
The example uses a standard SharePoint task list and formats tasks based on the due date. The end result is a list view sorted by due date with item text or background coloured to represent the number of days until the due date.
The Process
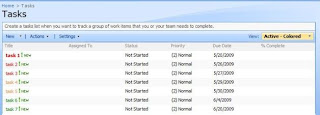
In this example I have started with a standard task list and have created a few sample items for testing / demonstration.
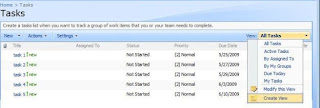
From the task list, create a new view, starting from the default “Active Items” view (filtered to only display incomplete tasks). The view created in the example is called “Active – Coloured”
Open the view using SharePoint Designer. Right click on the List View Web Part and select “Convert to XSL Data View”. This will automatically convert settings for the current view into data view parameters.
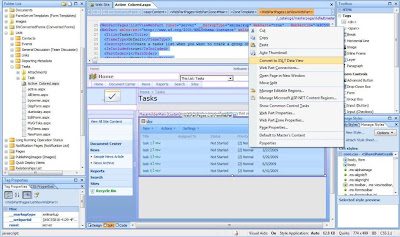
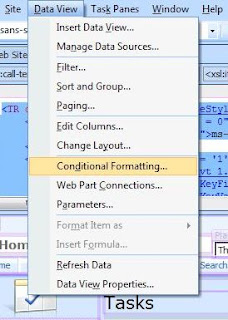
Once the Web Part has been converted into a Data View Web Part, click the “Title” field if an item in the list to select it. From the Data View menu, select “Conditional Formatting”. To set the background colour of a row using conditional formatting, select the row instead of the “Title” field.
Formatting Conditions:
1/ Set all tasks with a due date more than a week away to be Green
- Start by setting the field to Due Date, greater than (>) the current date [today]

- Important: click in the grey section to deselect condition once set. If this is not done, changes to the advanced expression may not be applied.
- Click “Advanced” to open the “Advanced Condition” dialog.
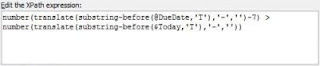
- Add -7 before the last parenthesis in the start of the expression. See example below, the change is in bold:
number(translate(substring-before(@DueDate,'T'),'-','')-7) > number(translate(substring-before($Today,'T'),'-',''))
- Press “OK”. --> Condition should read "Using advanced expression"
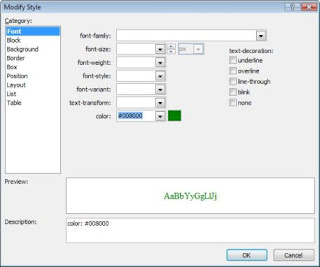
-Press “OK”. --> Modify Style dialog should appear. Set required styles (font color to green in this case)

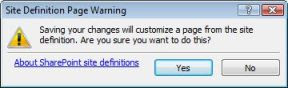
You may receive a “Site Definition Page Warning” message after customising the data view, or when saving the page. This has been fine in the past for me as I have not detached the masterpage and the style sheet remains linked to the page, so the page layout and any styles remain. If you are not sure, click the “About SharePoint site definitions” link on the dialog to get more information.
Note: To detect if a site has customised pages, SharePoint Designer provides necessary reporting features. To access the features, select “Reports” from the “Site” menu, then “Customised Pages”. For more detailed instructions, see the following article;
SharePoint Designer (2007) - Run reports for all sites programmatically. The article also demonstrates a method of performing reporting using SharePoint Designer for all sites in a site collection.
2/ Set all tasks with a due date less than a week, but more than 3 days away to yellow
- repeat (create new condition for the title field or row background) with less than or equal to -7 as condition. Advanced expression below:
number(translate(substring-before(@DueDate,'T'),'-','')-7) <= number(translate(substring-before($Today,'T'),'-',''))
3/ Set all tasks with a due date less than a week, but more than 3 days away to orange
Repeat with less than or equal to -3 as the condition. Advanced expression below:
number(translate(substring-before(@DueDate,'T'),'-','')-3) <= number(translate(substring-before($Today,'T'),'-',''))
4/ Set all tasks due today (1 day) to red
- Repeat with less than or equal to -1 as condition (include the -1). Advanced expression below:
5/ Set overdue tasks text to bold (already red from the previous condition)
- No advanced expression is required for this condition. Using the “Condition Criteria” dialog, simply set the field to the due date and the condition to less than the current date ( @DueDate < [Today] ).
The title for each task in the list should now be coloured dynamically based on the due date. The same method can be used to format items based on priority or most other columns.


The example uses a standard SharePoint task list and formats tasks based on the due date. The end result is a list view sorted by due date with item text or background coloured to represent the number of days until the due date.
The Process
In this example I have started with a standard task list and have created a few sample items for testing / demonstration.
From the task list, create a new view, starting from the default “Active Items” view (filtered to only display incomplete tasks). The view created in the example is called “Active – Coloured”

Open the view using SharePoint Designer. Right click on the List View Web Part and select “Convert to XSL Data View”. This will automatically convert settings for the current view into data view parameters.

Once the Web Part has been converted into a Data View Web Part, click the “Title” field if an item in the list to select it. From the Data View menu, select “Conditional Formatting”. To set the background colour of a row using conditional formatting, select the row instead of the “Title” field.

Formatting Conditions:
1/ Set all tasks with a due date more than a week away to be Green
- Start by setting the field to Due Date, greater than (>) the current date [today]

- Important: click in the grey section to deselect condition once set. If this is not done, changes to the advanced expression may not be applied.
- Click “Advanced” to open the “Advanced Condition” dialog.

- Add -7 before the last parenthesis in the start of the expression. See example below, the change is in bold:
number(translate(substring-before(@DueDate,'T'),'-','')-7) > number(translate(substring-before($Today,'T'),'-',''))
- Press “OK”. --> Condition should read "Using advanced expression"
-Press “OK”. --> Modify Style dialog should appear. Set required styles (font color to green in this case)


You may receive a “Site Definition Page Warning” message after customising the data view, or when saving the page. This has been fine in the past for me as I have not detached the masterpage and the style sheet remains linked to the page, so the page layout and any styles remain. If you are not sure, click the “About SharePoint site definitions” link on the dialog to get more information.

Note: To detect if a site has customised pages, SharePoint Designer provides necessary reporting features. To access the features, select “Reports” from the “Site” menu, then “Customised Pages”. For more detailed instructions, see the following article;
SharePoint Designer (2007) - Run reports for all sites programmatically. The article also demonstrates a method of performing reporting using SharePoint Designer for all sites in a site collection.
2/ Set all tasks with a due date less than a week, but more than 3 days away to yellow
- repeat (create new condition for the title field or row background) with less than or equal to -7 as condition. Advanced expression below:
number(translate(substring-before(@DueDate,'T'),'-','')-7) <= number(translate(substring-before($Today,'T'),'-',''))
3/ Set all tasks with a due date less than a week, but more than 3 days away to orange
Repeat with less than or equal to -3 as the condition. Advanced expression below:
number(translate(substring-before(@DueDate,'T'),'-','')-3) <= number(translate(substring-before($Today,'T'),'-',''))
4/ Set all tasks due today (1 day) to red
- Repeat with less than or equal to -1 as condition (include the -1). Advanced expression below:
number(translate(substring-before(@DueDate,'T'),'-','')-1) <= number(translate(substring-before($Today,'T'),'-',''))
5/ Set overdue tasks text to bold (already red from the previous condition)
- No advanced expression is required for this condition. Using the “Condition Criteria” dialog, simply set the field to the due date and the condition to less than the current date ( @DueDate < [Today] ).
The title for each task in the list should now be coloured dynamically based on the due date. The same method can be used to format items based on priority or most other columns.


Did you discover that once the conditional format is applied, you can no longer modify the view or export the data?
ReplyDeleteHi ThinkOnItDevotions,
ReplyDeleteYou will need to modify views which have been converted into Data View web parts using SharePoint Designer. You can update the name of the view when editing the settings for the view using the browser interface.
I usually use a combination of standard views (List View Web Parts) and formatted Data Views, as the standard Views can be easily changed, as well as exported when required. Views that have been converted to Data View web parts will not export the columns set in the Data View, although Web Part connections should still be available when using Data View web parts with conditional formatting.
Thanks
Daniel
Hi, are you able to use conditional formatting on a joined subview / nested table? Nothing I am doing seems to be able to work... Thanks, Andrew
ReplyDeleteIs there a maximum of 20 days or something, I can not get it to work with 90 days.. :)
ReplyDeletehi i have used the above approach, i want to display the user specific list view with condition based style applied. i created view and applied styles based on a condition, it is working fine when i see it direct. But when i go to the corresponding list webpart and change the current view name with my custom view created, it is prompting error that"cannot save and apply this property to the webpart". please tell me the proper way to get rid of this
ReplyDelete90 days does not work because what SP does under the covers is just push the date into a string and then convert it to a number
ReplyDeleteso 2010-04-29 becomes 20100429. It then subtracts 90 from this value to get 20100321 when what you are really after is 20100128
Hi, I want to allow people to view the data using conditional formatting,if "Assigned to" is equals to logged in user. How can I show that?
ReplyDeleteHi @sivastree,
ReplyDeleteThere may be a number of possibilities here depending on the result that you are trying to achieve. If a user should only see items from the list that are assigned to them, you may be able to use a filter instead of conditional formating, which should perform better. This would be at the item level, so a 'row' in the data view will only be included if the corresponding item in SharePoint is assigned to them.
To do this in Sharepoint 2007, you would create a filter on the Assigned To field with the criteria as [Current User] (parameter from the Value dropdown). This will result in a user only seeing items from the list that are assigned to them.
To achieve using conditional formatting in Sharepoint 2007, you can add conditional formatting to "Show Content...". For the condition, select the Assigned to field in the "Field Name" column, and the [Current User] parmeter for the Value column of the condition (the [Current User] parameter should be close to the bottom of the list). This is assuming that you have created the dataview from a list in SharePoint.
In SharePoint 2010 for a XSL List View the process is the same, but the [Current User] parameter is not always available to select when applying conditional formatting criteria. To allow the [Current User] to be selected as the value for Conditional Frmatting Criteria, you may need to add the following to the list of ParameterBindings (under the existing ParameterBinding elements) for the XLV Web part:
<ParameterBinding Name="UserID" Location="CAMLVariable" DefaultValue="CurrentUserName"/>
Once this has been added, you will be able to select [Current User] as the value for the conditional formatting criteria. Depending on the format of the value in the UserID variable, you may need to use the AssignedTo.title as the field instead of AssignedTo, which can be accessed via the "More Fields..." option or by creating the condition using the advanced editor.
Let me know if this helps.